扫码登录实战系列 1: 原理及流程设计
在开始所有内容之前,先看下最终的成果是怎样的。话不多说上代码:
startAppAuthScanning({
  onSuccess(userInfo) {
    localStorage.setItem('token', userInfo.token);
  }
})
我们要通过这五行代码,在 Web 实现一个完整的扫码登录表单!且用户扫码授权之后会回调 onSuccess 函数,从而获取到用户信息。

我们将从原理到接口设计,再到实际编码,最后封装 SDK,实现一个完整且开发者友好的扫码登录模块。完整的代码在这里:https://github.com/liaochangjiang/scan-qrcode-demo
通过这篇文章文章,你可以学到:
- 使用 jwt 完成用于登录、认证
- 了解完整的扫码登录流程
- 理解扫码登录本质
- 优秀的封装接口能力
原理及流程设计
首先,我们先尝试用一句话定义一下扫码登录的本质:扫码登录本质上是请求登录方请求已登录方将登录凭证写入特定媒介的过程。这里的请求登录方为 Web 端,已登录方为 APP 端,登录凭证可以是用户信息,也可以是换取用户信息的凭证,而特定媒介是某一张二维码。
具体的扫码登录流程大致如下:
- 打开登录页面,展示一个二维码,同时轮询二维码状态(web)
- 打开APP扫描该二维码后,APP显示确认、取消按钮(app)
- 登录页面展示被扫描的用户头像等信息(web)
- 用户在APP上点击确认登录(app)
- 登录页面从轮询二维码状态得知用户已确认登录,并获取到登录凭证(web)
- 页面登录成功,并进入主应用程序页面(web)
整个过程中,一张特定二维码起到了连接请求登录方和已登录方桥梁的作用。而二维码本质上就是通过某种约定的编码方式将一段文本信息转换为一个能够被解码识别的图片,其本质就是一段文本信息。所以,我们可以将二维码 ID、创建时间、过期时间等信息写入二维码,APP 终端通过解码二维码信息(这是终端媒介具备的基础功能),就能够识别出此二维码。
在 Web 端,一般会有一个请求生成二维码的接口,此接口会返回二维码 ID 和二维码连接,ID 用于查询二维码最新状态,链接用于展示。
这样,Web 端和 APP 端就建立起了一个共识:二维码 ID。APP 端通过授权修改二维码状态,Web 端能通过轮询监听到二维码状态变化,并获取到登录凭证,从而完成登录。
再来详细分解一下,二维码一共具有哪些状态:
- 未扫描
- 已扫描,等待用户确认
- 已扫描,用户同意授权
- 已扫描,用户取消授权
- 已过期
APP 可以修改二维码状态,一共会用到三个接口:
- 确认已扫描
- 同意授权
- 取消授权
一旦 Web 端监听到二维码状态变成了同意授权,登录就完成了。
APP 端请求这些接口时,需要带上登录凭证(这是显然的),后端接口能够从此判断同意授权的用户,从而将二维码 ID 和用户 ID 绑定起来。
现在我们应该很清楚该怎么做了,来总结一下需要提供哪些接口:
- 二维码生成接口
- 二维码状态查询接口
- 标记二维码以扫描接口
- 同意授权接口
- 取消授权接口
下面开始实际的代码实现部分。
扫码登录实战系列 2: 后端接口实现
技术栈:Node.JS + express + MongoDB
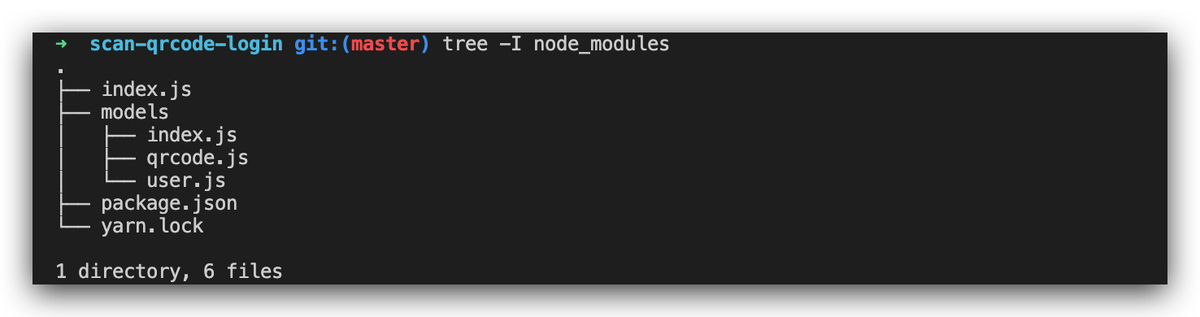
构建工程
$ mkdir scan-qrcode-login && cd scan-qrcode-login
$ yarn init --yes
$ yarn add express mongoose moment
$ touch index.js
如果你还没有运行数据库,可以很快使用 docker 起一个:
docker run --name mongodb -p 27017:27017 -d mongodb添加五个接口并开启数据库连接:
这里监听了 mongoose. connection.once('open') 事件,当数据库连接建立时调用 app.listen()。
const express = require('express')
const mongoose = require('mongoose');
const bodyParser = require("body-parser")
const cors = require('cors')
const app = express()
const port = 8888

app.use(cors());
app.use(bodyParser.json());
app.use(bodyParser.urlencoded({ extended: true }))

// 二维码生成接口
app.get('/qrcode/gene', async (req, res) => {

})

// 二维码状态查询接口
app.get('/qrcode/check', async (req, res) => {

})

// 标记二维码已扫描接口
app.get('/qrcode/scanned', async (req, res) => {

})

// 同意授权接口
app.get('/qrcode/confirm', async (req, res) => {

})

// 取消授权接口
app.get('/qrcode/cancel', async (req, res) => {

})

connect();

function listen() {
  app.listen(port);
  console.log('Express app started on port ' + port);
}

function connect() {
  mongoose.connection
    .on('error', console.log)
    .on('disconnected', connect)
    .once('open', listen);
  return mongoose.connect('mongodb://localhost:27017/scan-qrcode', { keepAlive: 1, useNewUrlParser: true });
}
我们将在下面马上来实现这五个接口。
二维码生成接口
GET qrcode/gene
前面说过二维码信息本质上就是一段文本信息,所以我们需要将一段特定信息写入进二维码。常见的方式有下面几种:
- 直接将二维码的标志 ID、创建时间、到期时间等相关信息写进去,这样客户端扫码解析的时候,就能够直接获取二维码 ID。(还记得前面讲的吗?扫码登录关键点是让客户端和 Web 端对二维码 ID 达成共识。)
- 写入一个包含 ticket 的 url,可以通过此 ticket 获取二维码 ID。这有一个好处,比如说使用其他app扫描此二维码时,会访问该url地址,这个时候你就可以做一道重定向到其他你想让用户看到的地址。比如通过 UA 实现跳转 app store 引导用户下载。
创建 Model
先创建两个 Model:User 和 QRCode。
models/user.js:
const mongoose = require('mongoose');
const Schema = mongoose.Schema;

const UserSchema = new Schema({
  username: String,
  password: String,
  token: String
})

module.exports = mongoose.model('User', UserSchema);
models/qrcode.js:
const mongoose = require('mongoose');
const Schema = mongoose.Schema;

const QRCodeSchema = new Schema({
  _allreadyUsed: {
    type: Boolean,
    default: false
  },
  userId: {
    type: Schema.Types.ObjectId,
    ref: "User"
  },
  url: String,
  // 是否已经被扫码
  scanned: {
    type: Boolean,
    default: false
  },
  status: {
    type: Number,
    default: 0 // 0 - 未确认;1 - 确认授权;-1 - 取消授权
  },
  // 用来换 userInfo
  ticket: String,
  userInfo: {
    type: Object,
    default: {}
  },

  createdAt: {
    type: Date,
    default: Date.now
  },
  expireAt: {
    type: Date
  }
});

module.exports = mongoose.model('QRCode', QRCodeSchema);
models/index.js:
const UserModel = require("./user")
const QRCodeModel = require("./qrcode")

module.exports = {
  UserModel,
  QRCodeModel
}
之后便可以在 index.js 中这样引入:
const { UserModel, QRCodeModel } = require("./models")编写接口
生成二维码用到 https://github.com/soldair/node-qrcode这个库,使用 yarn 安装:
yarn add qrcode代码很简单,主要分成几步:
- 将二维码存入数据库
- 将 qrcodeData 转换成文本之后写入二维码
- 返回结果
const moment = require("moment")
const QRCodeNode = require("qrcode");
app.get('/qrcode/gene', async (req, res) => {
// 将二维码存入数据库
const qrcode = new QRCodeModel({
createdAt: Date.now(),
expireAt: moment(Date.now()).add(120, 's').toDate(),
})
await qrcode.save()
// 将 qrcodeData 转换成文本之后写入二维码
let qrcodeData = {
qrcodeId: qrcode._id,
createdAt: qrcode.createdAt,
expireAt: qrcode.expireAt,
}
const qrcodeUrl = await QRCodeNode.toDataURL(JSON.stringify(qrcodeData));
// 返回结果
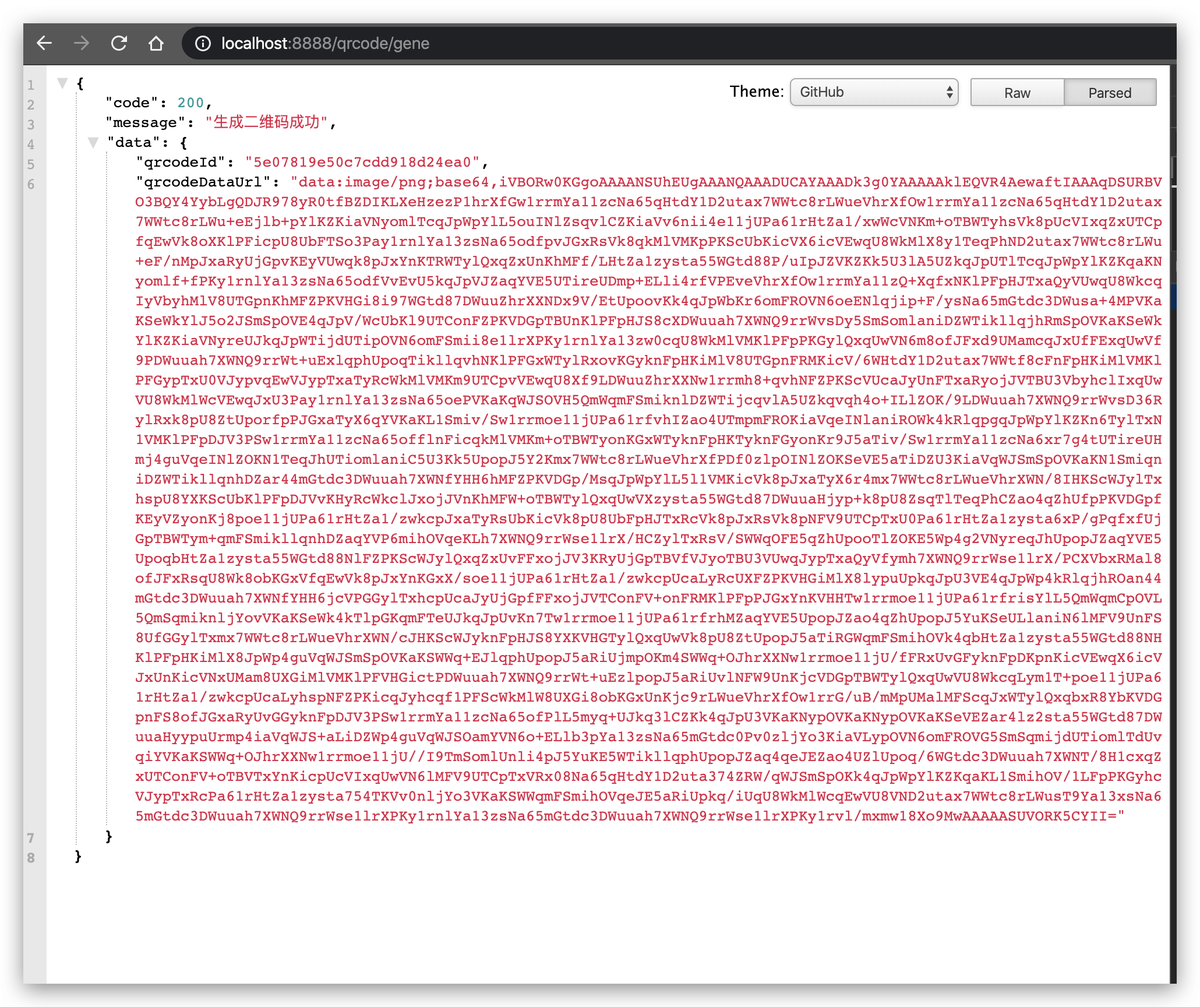
res.send({
code: 200,
message: '生成二维码成功',
data: {
qrcodeId: qrcode._id,
qrcodeUrl
}
})
})之后访问 http://localhost:8888/qrcode/gene,就能够得到请求结果了:
二维码状态查询接口
GET /qrcode/check?qrcodeId=xxxxx
代码很简单:这里只有几点说明一下。而这也是我想告诉大家的接口设计最佳实践:
- 这里将 scanned, expired, success, canceled 这些决定业务最终状态的结果计算出来,而不是只返回一个状态码,让前端自己去计算。
app.get('/qrcode/check', async (req, res) => {
  const { qrcodeId } = req.query;
  const qrcode = await QRCodeModel.findOne({ _id: qrcodeId })

  if (!qrcode) {
    res.send({
      code: 2241,
      message: '二维码不存在',
      data: null
    })
    return
  }

  res.send({
    code: 200,
    message: '查询二维码状态成功',
    data: {
      qrcodeId,
      scanned: qrcode.scanned,
      expired: moment() >= moment(qrcode.expireAt),
      success: qrcode.status === 1,
      canceled: qrcode.status === -1,
      status: qrcode.status,
      userInfo: qrcode.userInfo,
      ticket: qrcode.ticket,
    }
  })
})
标记已扫描接口
POST /qrcode/scanned
- Body 参数:
- qrcodeId: 二维码 ID
这个接口需要请求用户出于登录态,这一部分我们用 jwt 来实现。先实现两个 jwt 编码、解码的函数:
function generateToken(data, secret) {
  let iat = Math.floor(Date.now() / 1000);
  let exp = Math.floor(Date.now() / 1000) + 60 * 60 * 24 * 15; // 有效期 15 天
  let token = jwt.sign(
    {
      data,
      iat,
      exp,
    },
    secret,
  );
  return token
}

function decryptToken(token, secret) {
  try {
    token = token.replace('Bearer ', '')
    let res = jwt.verify(token, secret);
    return res;
  } catch (err) {
    return false;
  }
}
再实现两个注册、登录函数:
app.post('/login', async (req, res) => {
const { username, password } = req.body
const user = await UserModel.findOne({
username,
password
})
if (!user) {
res.send({
code: 403,
message: '用户名密码不正确'
})
return
}
const token = generateToken({ userId: user._id, username, avatar: user.avatar }, "s3cret")
res.send({
code: 200,
message: '登录成功',
data: {
_id: user._id,
username,
token
}
})
})
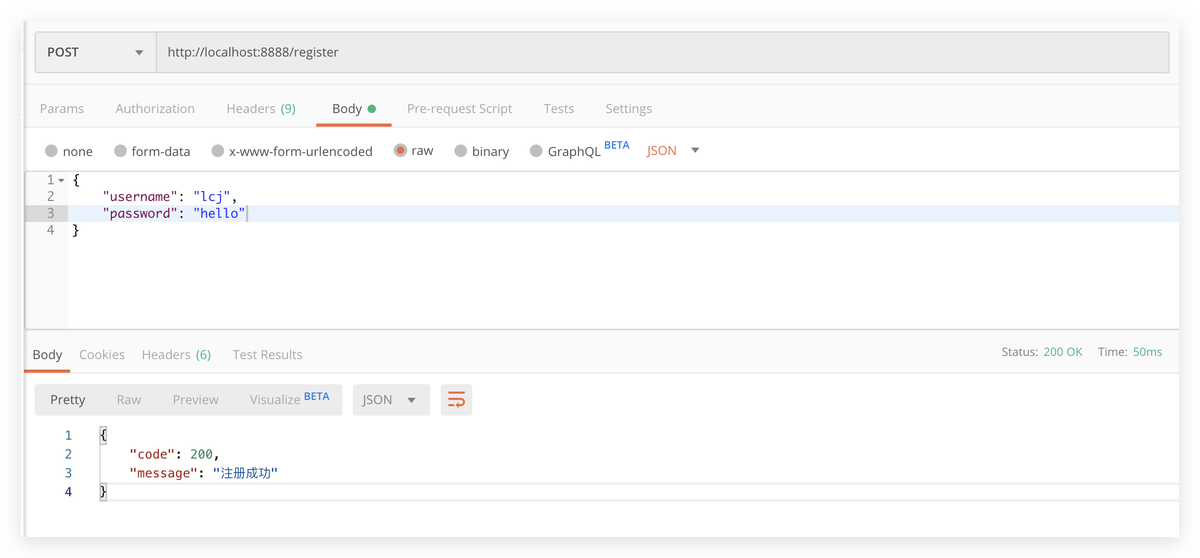
app.post('/register', async (req, res) => {
const { username, password } = req.body
if ((await UserModel.findOne({ username, password }))) {
res.send({
code: 500,
message: '用户名已被注册'
})
return
}
const user = new UserModel({
username,
password,
avatar: "https://usercontents.authing.cn/authing-avatar.png"
})
await user.save()
res.send({
code: 200,
message: '注册成功'
})
})打开任何 API 调试工具,模拟请求完成注册登录:
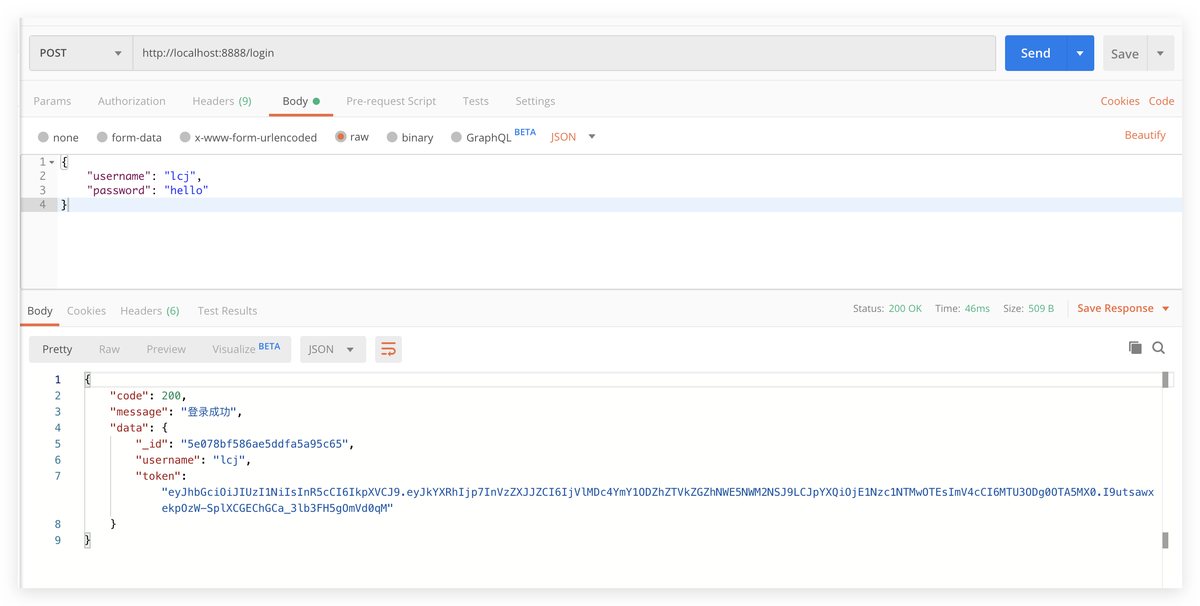
返回的 token 就是我们的登录凭证啦!
eyJhbGciOiJIUzI1NiIsInR5cCI6IkpXVCJ9.eyJkYXRhIjp7InVzZXJJZCI6IjVlMDc4YmY1ODZhZTVkZGZhNWE5NWM2NSJ9LCJpYXQiOjE1Nzc1NTMwOTEsImV4cCI6MTU3ODg0OTA5MX0.I9utsawxekpOzW-SplXCGEChGCa_3lb3FH5gOmVd0qM接下来,完成一个认证中间件,用户判断当前请求的用户是否已登录:
- 从 authorization 请求头中获取 token
- 调用 decryptToken 尝试对此 token 进行解码
- 如果成功:说明此 token 是系统签署的,标志此用于是处于登录态,可以继续执行下面的业务。
- 如果失败,直接调用 res.send 结束请求。
const authenticated = async (req, res, next) => {
  const authorationToken = req.headers['authorization']
  const decoded = decryptToken(authorationToken, 's3cret')
  if (!decoded) {
    res.send({
      code: 403,
      message: '请先登录'
    })
    return
  }
  req.logged = true
  req.user = {
    userId: decoded.data.userId,
    username: decoded.data.username,
    avatar: decoded.data.avatar,
    token: authorationToken
  }
  await next()
}
给/qrcode/scanned加上此中间件并完成两个操作:
- 标记二维码 scanned 字段为 true
- 将用户名和头像保存至二维码的 userInfo 字段。这里只保存这两项,用于前端监控到用于已扫码时展示头像。参考微信 web 端扫码登录:
 const { qrcodeId } = req.body
  const qrcode = await QRCodeModel.findOne({ _id: qrcodeId })

  if (!qrcode) {
    res.send({
      code: 2241,
      message: '二维码不存在',
      data: null
    })
    return
  }
  await QRCodeModel.findOneAndUpdate({ _id: qrcodeId }, {
    scanned: true, userInfo: {
      username: req.user.username,
      avatar: req.user.avatar
    }
  })
  res.send({
    code: 200,
    message: '扫码成功'
  })
})
同意授权接口
- 将二维码 status 改为 1
- 二维码 userInfo 写入用户的完整信息
- 包含 token 和用户 id
- 前端得到 token 后就可以完成跳转了
app.post('/qrcode/confirm', authenticated, async (req, res) => {
  const { qrcodeId } = req.body
  const qrcode = await QRCodeModel.findOne({ _id: qrcodeId })

  if (!qrcode) {
    res.send({
      code: 2241,
      message: '二维码不存在',
      data: null
    })
    return
  }
  await QRCodeModel.findOneAndUpdate({ _id: qrcodeId }, {
    status: 1, userInfo: req.user
  })
  res.send({
    code: 200,
    message: '扫码成功'
  })
})
取消授权接口
app.post('/qrcode/cancel', async (req, res) => {
  const { qrcodeId } = req.body
  const qrcode = await QRCodeModel.findOne({ _id: qrcodeId })

  if (!qrcode) {
    res.send({
      code: 2241,
      message: '二维码不存在',
      data: null
    })
    return
  }
  await QRCodeModel.findOneAndUpdate({ _id: qrcodeId }, {
    status: -1,
  })
  res.send({
    code: 200,
    message: '扫码成功'
  })
})
扫码登录实战系列 3: 前端 SDK 封装
有了后端的接口,现在就具备了实现扫码登录的所需的一切了,只需要 web 端和 app 端调用即可。为了 web 端能够更方便地调用,我们接下来一步一步封装成 sdk。这也是我们文章最开头所展示的最终成果:
startAppAuthScanning({
  onSuccess(userInfo) {
    localStorage.setItem('token', userInfo.token);
  }
})
我们一共要封装 4 个 API:
- geneQRCode 生成二维码
- checkQRCodeStatus: 查询二维码状态
- startPollingQRCodeStatus: 开始轮询
- startAppAuthScanning: 对上述所有方法的封装,一键生成扫码登录组件
geneQRCode
const host = "http://localhost:8888"
function geneQRCode() {
  let url = `${host}/qrcode/gene`
  return axios.get(url).then(res => {
    return res.data
  }).catch(err => {
    return err
  });
}
checkQRCodeStatus
// 检验微信二维码扫描状态
function checkQRCodeStatus(qrcodeId) {
  let url = `${host}/qrcode/check?qrcodeId=${qrcodeId}`
  return axios.get(url).then(res => {
    return res.data
  }).catch(err => {
    return err
  });
}
startPollingQRCodeStatus
先设计接口:采用注册回调函数的方式,一共有以下可用注册函数:
- onPollingStart,轮询开始时回调,回调参数 intervalNum 是 startInterval 返回的 interval id,可以调用 clearInterval 手动关闭轮询。
- onResult:每次获取到最新二维码状态时都会回调。
- onScanned:用户扫码时回调,只回调一次。
- onSuccess:用户同意授权时回调,只回调一次,之后轮询结束。
- onCancel:用户取消授权时回调,只回调一次,之后轮询结束。
- onExpired:二维码过期时回调,只回调一次,之后轮询结束。
- onError:每次获取二维码信息失败时回调,失败原因可能有二维码不存在等。
authing.startPollingQRCodeStatus({
  qrcodeId,
  interval: 1000,
  onPollingStart: (intervalNum) => { },
  onResult: (res) => { },
  onScanned: (userInfo) => { },
  onSuccess: (userInfo) => { },
  onCancel: () => { },
  onExpired: () => { },
  onError: (data) => { }
})
以下是具体实现:每当发生某事件时,判断一下是否有相应回调函数注册,如果有就调用回调函数。
由于篇幅限制,这里就不对参数进行检验了。
function startPollingQRCodeStatus(options) {
  let { qrcodeId, interval = 800, onPollingStart, onResult, onScanned, onExpired, onSuccess, onCancel, onError } = options

  let intervalNum = 0
  let calledOnScanned = false
  let calledOnPoolingStart = false

  intervalNum = setInterval(() => {
    // 开始轮询时回调 onPollingStart
    if (onPollingStart && ! calledOnPoolingStart) {
      onPollingStart(intervalNum)
      calledOnPoolingStart = true
    }

    checkQRCodeStatus(qrcodeId).then(res => {

      // 业务状态码 code = 200 表示成功查询到二维码状态
      if (res.code === 200) {

        // 每次获取到数据都回调 onResult 函数
        if (onResult) {
          onResult(res)
        }

        const data = res.data;
        // 第一次查询到已扫码状态,回调 onScanned
        if (data.scanned) {
          if (onScanned && !calledOnScanned) {
            const { userInfo } = data
            onScanned(userInfo)
            calledOnScanned = true
          }
        }

        // 二维码过期,清除定时器
        if (data.expired) {
          clearInterval(intervalNum)
          if (onExpired) {
            onExpired()
          }
        }

        // 成功登录
        if (data.success) {
          clearInterval(intervalNum)
          const { ticket, userInfo } = data
          if (onSuccess) {
            onSuccess({
              ticket,
              userInfo
            })
          }
        }

        // 用户取消
        if (data.canceled) {
          clearInterval(intervalNum)
          if (onCancel) {
            onCancel()
          }
        }

      } else {
        // 业务状态码不为 200,可能是由于二维码不存在等原因
        if (onError) {
          onError(res)
        }
      }
    })
  }, interval)

  return intervalNum
}
startAppAuthScanning
先设计 API:
- mount:可选,二维码挂载点,如不写则默认漂浮在文档中间
- interval:轮询间隔时间。
- onPollingStart 到 onError 和 startPollingQRCodeStatus 意义一致,事实上这部分就是直接调用的 startPollingQRCodeStatus。
- onQRCodeLoad:二维码首次成功加载时回调。参数 qrcode 是一个字典,包含两个字段:qrcodeId、qrcodeUrl。
- onQRCodeShow:二维码首次出现在页面上时回调。参数 qrcode 同上。
- onQRCodeLoadFaild:二维码加载失败时会被回调。
- 其余的是一些自定义文字展示
startAppAuthScanning({
  mount: '', // 可选,二维码挂载点,如不写则默认漂浮在文档中间
  interval: 1000, // 可选,轮询间隔时间,默认为 800 ms
  onPollingStart: (intervalNum) => {},
  onResult: (res) => {},
  onScanned: (userInfo) => {},
  onSuccess: (data) => {
      const { ticket, userInfo } = data;
  },
  onCancel: () => {},
  onExpired: () => {},
  onError: (data) => {},

  onQRCodeShow: (qrcode) => {},
  onQRCodeLoad: (qrcode) => {},
  onQRCodeLoadFaild: (error) => {},
  tips: '使用 <strong> APP </strong> 扫码登录',
  scannedTips: '用户已扫码,等待确认',
  canceledTips: '用户取消授权',
  expiredTips: '二维码已过期',
  successTips: '扫码成功',
  retryTips: '重试',
  failedTips: '网络出错,请重试'
})
这个方法是以上所有方法的封装,主要逻辑如下:
- 调用 geneQRCode 生成二维码
- 在浏览器文档中展示二维码
- 调用 startPollingQRCodeStatus 开始轮询
- 发生相应事件的时候调用注册的回调函数
具体实现如下:
function startAppAuthScanning(options) {

  let { mount = "authing__app-scan-qrcode-root-node", interval = 800,
    onPollingStart, onResult, onScanned, onExpired, onSuccess, onCancel, onError, onQRCodeShow, onQRCodeLoad,
    onQRCodeLoadFaild,
    tips = "使用 <strong> APP </strong> 扫码登录",
    scannedTips = "用户已扫码,等待确认",
    canceledTips = "用户取消授权",
    expiredTips = "二维码已过期",
    successTips = "扫码成功",
    retryTips = "重试",
    failedTips = "网络出错,请重试",
    qrcodeSize = {
      height: 240,
      width: 240
    },
    containerSize = {
      height: 300,
      width: 300
    },
  } = options


  // mount 二维码
  const mountNode = mount
  let qrcodeNode = document.getElementById(mountNode);
  let qrcodeWrapper;
  let needGenerate = false;
  if (!qrcodeNode) {
    qrcodeNode = document.createElement('div');
    qrcodeNode.id = mountNode;
    qrcodeNode.style = `z-index: 65535;position: fixed;background: #fff;width: ${containerSize.width}px;height: ${containerSize.height}px;left: 50%;margin-left: -${containerSize.width / 2}px;display: flex;justify-content: center;align-items: center;top: 50%;margin-top: -${containerSize.height / 2}px;border: 1px solid #ccc;`;
    document.getElementsByTagName('body')[0].appendChild(qrcodeNode);
    needGenerate = true;
  } else {
    qrcodeNode.style = 'position:relative';
  }

  // 创建 <style>
  const styleNode = document.createElement('style'); const
    style = '#authing__retry a:hover{outline:0px;text-decoration:none;}#authing__spinner{position:absolute;left:50%;margin-left:-6px;}.spinner{margin:100px auto;width:20px;height:20px;position:relative}.container1>div,.container2>div,.container3>div{width:6px;height:6px;background-color:#00a1ea;border-radius:100%;position:absolute;-webkit-animation:bouncedelay 1.2s infinite ease-in-out;animation:bouncedelay 1.2s infinite ease-in-out;-webkit-animation-fill-mode:both;animation-fill-mode:both}.spinner .spinner-container{position:absolute;width:100%;height:100%}.container2{-webkit-transform:rotateZ(45deg);transform:rotateZ(45deg)}.container3{-webkit-transform:rotateZ(90deg);transform:rotateZ(90deg)}.circle1{top:0;left:0}.circle2{top:0;right:0}.circle3{right:0;bottom:0}.circle4{left:0;bottom:0}.container2 .circle1{-webkit-animation-delay:-1.1s;animation-delay:-1.1s}.container3 .circle1{-webkit-animation-delay:-1.0s;animation-delay:-1.0s}.container1 .circle2{-webkit-animation-delay:-0.9s;animation-delay:-0.9s}.container2 .circle2{-webkit-animation-delay:-0.8s;animation-delay:-0.8s}.container3 .circle2{-webkit-animation-delay:-0.7s;animation-delay:-0.7s}.container1 .circle3{-webkit-animation-delay:-0.6s;animation-delay:-0.6s}.container2 .circle3{-webkit-animation-delay:-0.5s;animation-delay:-0.5s}.container3 .circle3{-webkit-animation-delay:-0.4s;animation-delay:-0.4s}.container1 .circle4{-webkit-animation-delay:-0.3s;animation-delay:-0.3s}.container2 .circle4{-webkit-animation-delay:-0.2s;animation-delay:-0.2s}.container3 .circle4{-webkit-animation-delay:-0.1s;animation-delay:-0.1s}@-webkit-keyframes bouncedelay{0%,80%,100%{-webkit-transform:scale(0.0)}40%{-webkit-transform:scale(1.0)}}@keyframes bouncedelay{0%,80%,100%{transform:scale(0.0);-webkit-transform:scale(0.0)}40%{transform:scale(1.0);-webkit-transform:scale(1.0)}}';
  styleNode.type = 'text/css';
  if (styleNode.styleSheet) {
    styleNode.styleSheet.cssText = style;
  } else {
    styleNode.innerHTML = style;
  }
  document.getElementsByTagName('head')[0].appendChild(styleNode);


  // 一些显示事件
  const loading = () => {
    qrcodeNode.innerHTML = '<div id="authing__spinner" class="spinner"><div class="spinner-container container1"><div class="circle1"></div><div class="circle2"></div><div class="circle3"></div><div class="circle4"></div></div><div class="spinner-container container2"><div class="circle1"></div><div class="circle2"></div><div class="circle3"></div><div class="circle4"></div></div><div class="spinner-container container3"><div class="circle1"></div><div class="circle2"></div><div class="circle3"></div><div class="circle4"></div></div></div>';
  };

  const unloading = () => {
    const child = document.getElementById('authing__spinner');
    qrcodeNode.removeChild(child);
  };

  const genTip = (text) => {
    const tip = document.createElement('span');
    tip.class = 'authing__heading-subtitle';
    if (!needGenerate) {
      tip.style = 'display: block;font-weight: 400;font-size: 15px;color: #888;ine-height: 48px;';
    } else {
      tip.style = 'display: block;font-weight: 400;font-size: 12px;color: #888;';
    }
    tip.innerHTML = text;
    return tip;
  };

  const genImage = (src) => {
    const qrcodeImage = document.createElement('img');
    qrcodeImage.class = 'authing__qrcode';
    qrcodeImage.src = src;
    qrcodeImage.width = qrcodeSize.width;
    qrcodeImage.height = qrcodeSize.height;
    return qrcodeImage;
  };

  const genShadow = (text, aOnClick, shadowAId) => {

    let shadowId = 'authing__retry'

    if (document.getElementById(shadowId)) {
      document.getElementById(shadowId).remove()
    }

    const shadow = document.createElement('div');
    shadow.id = shadowId;
    shadow.style = `text-align:center;width: ${qrcodeSize.width}px;height: ${qrcodeSize.height}px;position: absolute;left: 50%;top: 0px;margin-left: -${qrcodeSize.width / 2}px;background-color: rgba(0,0,0, 0.5);line-height:${qrcodeSize.height}px;color:#fff;font-weight:600;`;

    const shadowA = document.createElement('a');
    shadowA.innerHTML = text;
    shadowA.style = 'color:#fff;border-bottom: 1px solid #fff;cursor: pointer;';
    shadowA.onclick = aOnClick;
    shadowA.id = shadowAId;
    shadow.appendChild(shadowA);
    return shadow;
  };

  const displayScannedUser = (nickname, photo) => {

    let shadowId = 'authing__retry'

    if (document.getElementById(shadowId)) {
      document.getElementById(shadowId).remove()
    }
    const shadow = document.createElement('div');
    shadow.style = `text-align:center;width: ${qrcodeSize.width}px;height: ${qrcodeSize.height}px;position: absolute;left: 50%;top: 0px;margin-left: -${qrcodeSize.width / 2}px;line-height:${qrcodeSize.height}px;color:#fff;font-weight:600;display: flex;
    align-items: center; /*垂直居中*/
    justify-content: center; /*水平居中*/`;
    shadow.id = shadowId;

    const img = document.createElement('img');
    img.id = 'authing__scanned-user';
    img.src = photo
    img.style = "width: 100px; height: 100px"
    shadow.appendChild(img);
    return shadow;
  };

  function genRetry(qrcodeElm, tipText, retryId) {
    const tip = genTip(tipText);

    qrcodeWrapper = document.createElement('div');
    qrcodeWrapper.id = 'authing__qrcode-wrapper';
    qrcodeWrapper.style = 'text-align: center;position: relative;';

    // TODO: 这里换一个二维码
    const qrcodeImage = genImage('https://usercontents.authing.cn/0ab3a1bf19c0d7106673e494d532f91a.png');

    if (!needGenerate) {
      qrcodeImage.style = 'margin-top: 12px;';
    } else {
      qrcodeImage.style = 'margin-top: 16px;';
    }

    qrcodeImage.onload = () => {
      unloading();
    };

    const shadow = genShadow(retryTips, () => {
      start();
    }, retryId || '__authing_retry_btn');

    qrcodeWrapper.appendChild(qrcodeImage);
    qrcodeWrapper.appendChild(shadow);
    qrcodeWrapper.appendChild(tip);
    qrcodeElm.appendChild(qrcodeWrapper);
  }


  let start = () => {
    loading();
    geneQRCode().then((res) => {
      if (res.code !== 200) {
        genRetry(qrcodeNode, res.message);
        if (onQRCodeLoadFaild) {
          onQRCodeLoadFaild(res);
        }
      } else {
        const { qrcodeId, qrcodeUrl } = res.data
        if (onQRCodeLoad) {
          onQRCodeLoad(qrcode);
        }

        if (qrcodeNode) {
          qrcodeWrapper = document.createElement('div');
          qrcodeWrapper.id = 'authing__qrcode-wrapper';
          qrcodeWrapper.style = 'text-align: center;position: relative;';

          const qrcodeImage = genImage(qrcodeUrl);
          qrcodeImage.onload = () => {
            unloading();
            if (onQRCodeShow) {
              onQRCodeShow({
                qrcodeId,
                qrcodeUrl
              });
            }

            // 需要对用户的 onSuccess, onScanned, onExpired, onCancel 进行加工从而在页面上展示相关提示
            let decoratedOnSuccess = function (data) {
              const shadow = genShadow(successTips, null, '__authing_success_tip');
              qrcodeWrapper.appendChild(shadow);
              if (onSuccess) {
                onSuccess(data)
              }
            }

            let decoratedOnScanned = function (userInfo) {
              const shadow = displayScannedUser(
                userInfo.nickname,
                userInfo.photo
              )
              qrcodeWrapper.appendChild(shadow);
              if (onScanned) {
                onScanned(userInfo)
              }
            }

            let decoratedOnCancel = function () {
              const shadow = genShadow(canceledTips, null, '__authing_success_tip');
              qrcodeWrapper.appendChild(shadow);
              if (onCancel) {
                onCancel()
              }
            }

            let decoratedOnExpired = function () {
              const shadow = genShadow(expiredTips, null, '__authing_success_tip');
              qrcodeWrapper.appendChild(shadow);
              if (onExpired) {
                onExpired()
              }
            }

            let decoratedOnError = function (data) {
              if (onError) {
                onError(data)
              }
            }

            // 开始轮询
            startPollingQRCodeStatus({
              qrcodeId,
              interval,
              onPollingStart,
              onResult,
              onScanned: decoratedOnScanned,
              onExpired: decoratedOnExpired,
              onSuccess: decoratedOnSuccess,
              onCancel: decoratedOnCancel,
              onError: decoratedOnError
            })
          };

          const tip = genTip(tips);
          qrcodeWrapper.appendChild(qrcodeImage);
          qrcodeWrapper.appendChild(tip);
          qrcodeNode.appendChild(qrcodeWrapper);
        }
      }
    }).catch((error) => {
      genRetry(qrcodeNode, failedTips);
      if (onQRCodeLoadFaild) {
        onQRCodeLoadFaild(error);
      }
    });
  };

  start();
}
有几点说明一下:
- 调用 startPollingQRCodeStatus 的时候,注册的 onScanned 回调函数用的是 decoratedOnScanned
startPollingQRCodeStatus({
  qrcodeId,
  interval,
  onPollingStart,
  onResult,
  onScanned: decoratedOnScanned,
  onExpired: decoratedOnExpired,
  onSuccess: decoratedOnSuccess,
  onCancel: decoratedOnCancel,
  onError: decoratedOnError
})
decoratedOnScanned 函数的作用是:先在扫码登录组件中展示用户头像,然后再回调用户注册的 onScanned。这样就即实现了 UI 展示,又没有影响正常的回调业务逻辑。
let decoratedOnScanned = function (userInfo) {
  const shadow = displayScannedUser(
    userInfo.nickname,
    userInfo.photo
  )
  qrcodeWrapper.appendChild(shadow);
  if (onScanned) {
    onScanned(userInfo)
  }
}
现在我们所有的函数就封装好了,创建一个 html 文件看下效果:
<!DOCTYPE html>
<html lang="en">

<head>
  <meta charset="UTF-8">
  <meta name="viewport" content="width=device-width, initial-scale=1.0">
  <meta http-equiv="X-UA-Compatible" content="ie=edge">
  <title>扫码登录 Demo</title>
</head>

<body>

</body>
<script src="https://unpkg.com/axios/dist/axios.min.js"></script>
<script src="./sdk/index.js"></script>
<script>
  startAppAuthScanning({
    onSuccess(userInfo) {
      console.log(userInfo)
    }
  })
</script>

</html>
本文的所有代码都在这里了:https://github.com/liaochangjiang/scan-qrcode-demo
扫码登录实战系列 4: 总结
本文是介绍性质的,所以存在很多可改进点。
比如说安全性:目前是直接在二维码查询接口返回完整用户信息的,而二维码状态查询接口没有做鉴权,这存在安全隐患,更好的做法是返回一个 ticket,使用此 ticket 换取用户信息。
还有一点在第二讲提到的:二维码保存的文本信息可以是一个 url,可以通过此 ticket 获取二维码 ID。这有一个好处,比如说使用其他app扫描此二维码时,会访问该url地址,这个时候你就可以做一道重定向到其他你想让用户看到的地址。比如通过 UA 实现跳转 app store 引导用户下载。
另外,本文的所有代码都在这里了:https://github.com/liaochangjiang/scan-qrcode-demo
最后说明一下,这也算是打个小广告了,本文的所有内容都来自于我实际工作的总结,在这里也是把内容抽象沉淀出来,分享给所有的开发者。我就职于一家国内领先的 IDaaS 公司:https://authing.cn,APP 扫码登录也是我们最近在开发的一个功能,除了此系列文章所介绍的基础内容外,我们还有更多 feature 和可自定义的配置:
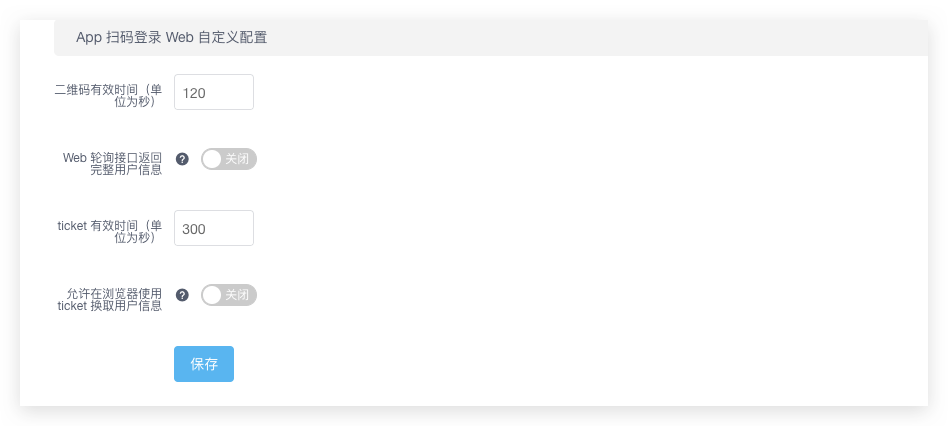
可以自定义二维码、ticket 有效时间,可以自己决定是否要在二维码状态查询接口返回完整用户信息,以及是否运行在浏览器用 ticket 换用户信息。
你可以通过以下途径更好地了解我们:
- 官网:https://authing.cn
- GItHub:https://github.com/authing
- 官方文档:https://docs.authing.cn
- 此文提到的 SDK,实际上也包含在https://github.com/authing/authing.js
另外,我们非常稀缺移动端的人才,包括 Swift, Objctive-C, Java, Kotlin, Flutter, React Native 等,欢迎联系我们噢!