撰稿人:Authing 邓家旺
我想先和大家从一个非常有趣的游戏说起:康威生命游戏。这是一种相当独特的无人游戏,它几乎全程不需要玩家参与,只需要布好初始的图像,就可以静静地观察游戏运行,如果我们能根据规则,找到规律,就会发现游戏中的网格可以组成各种复杂的结构。
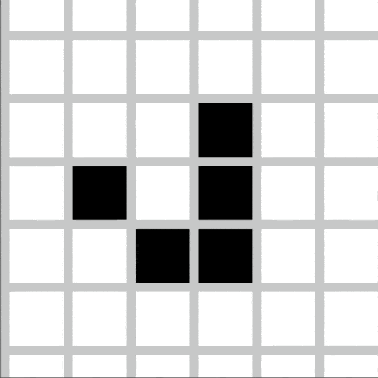
例如在游戏中,有一种结构叫做高斯帕滑翔机,每四个回合向右下方平移一格:
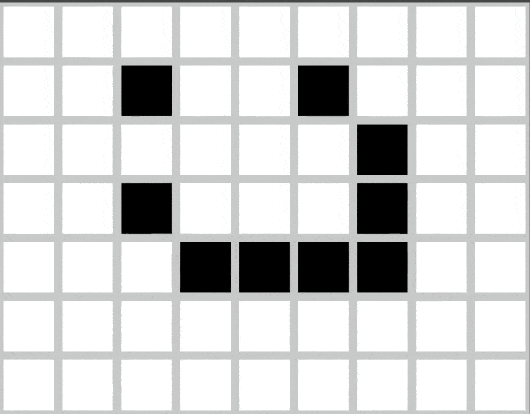
或者是轻型飞船,可以在4个回合向右移动两格,是生命游戏里最快的运动速度,可以理解为这个世界的“光速”。
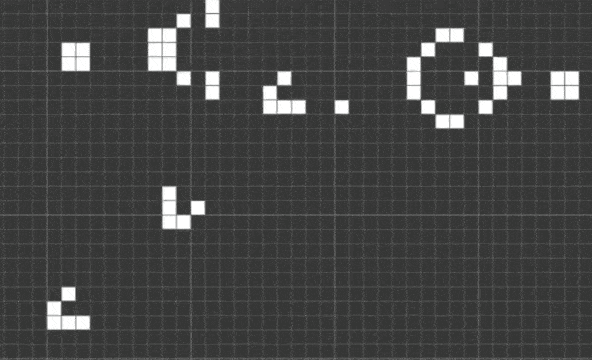
除了平移运动,甚至还可以创造出更加复杂的繁殖结构:高斯帕滑翔机枪,每14个回合就发射一架高斯帕滑翔机。
更不可思议的是,你甚至可以递归地用生命游戏来模拟另一个生命游戏,进而创造无穷巨大的结构。
这个游戏非常有意思,我们研究一下「生命游戏」在程序上是如何写出来的。
这个游戏本身很简单,本质上是两件事:
1.画格子,默认白色,允许用户操作绘制黑色(有生命)
2.根据规则,自动计算下一回合的格子状态,让格子自动刷新
所以我们要先做的第一件事是画格子,画格子有两种思路。
第一种是绘制线条,让线条在视觉上组成网格:

第二种是根据四个顶点连线,直接画「格子」:

稍作分析,会发现这个游戏基本不会对“线”有改动,所以我们就按第二个方案来绘制格子,这样我们就可以很方便地拿到格子的坐标,标记它的生命也非常简单,布尔值就行。
实现这个游戏在程序上要怎么做,我们需要思考几个问题:
1.怎么用程序实现矩形、多个矩形
2.怎么用程序计算下一回合的数值
3.怎么用程序根据数值,绘制新一轮的图像
4.最好能响应用户操作,交互(可以绑定用户的交互操作)
我们用最简单的 html + css + js 来实现,不用依赖任何库就可以做到这件事,事情分成几个阶段做,第一阶段最简单,画 1 个格子。
<canvas id="id-canvas" width="800" height="600"></canvas>

<script>
    const domCanvas = document.querySelector('#id-canvas')
    const context = domCanvas.getContext('2d')
    context.fillRect(100, 100, 40, 40)
</script>
只要能看到最基本的一个格子,就说明绘图是 OK 的。我们继续第二阶段:画很多格子。
const domCanvas = document.querySelector('#id-canvas')
const context = domCanvas.getContext('2d')

let { width, height } = domCanvas
let grids = initData(width, height, 40)
for (let i of grids) {
    context.strokeStyle = 'rgba(0, 0, 0, 1)'
    context.strokeRect(i.x, i.y, 40, 40)
}

// initData 不是重点,返回值是格子数组,结构大致如下
[
    {
        row: number,
        col: number,
        x: number,
        y: number,
        life: boolean,
    },
    ......
]
由于画很多格子需要在视觉上可辨认,所以我们就不填充格子了,而是画格子的边框,然后来一个 for 循环即可,这一步也很简单。
我们继续第三阶段:让 1 个格子运动起来。
let x = 100
let y = 100
let fps = 30
setInterval(() => {
    let { width, height } = domCanvas
    let gridLength = 40
    context.clearRect(0, 0, width, height)
    if (x < width - gridLength) {
        context.fillRect((x += 10), y, gridLength, gridLength)
    } else {
        context.fillRect(x, y, gridLength, gridLength)
    }
}, 1000 / fps)
这里的 fps 是指每秒刷新多少次,我们称为 “帧”。可以看到,格子每帧向右移动 10 个像素,并在碰到边界时停下。如果我们能让一个格子按我们所想的方式动起来,那么就能让所有格子都如此。
第四阶段:让所有格子动起来,闪烁。
let gridLength = 40
let { width, height } = domCanvas
let grids = initData(width, height, gridLength)
let fps = 2
setInterval(() => {
    context.clearRect(0, 0, width, height)
    for (let i of grids) {
        i.life = Math.random() > 0.5
        if (i.life === true) {
            context.fillStyle = 'gray' // 稍微灰色一点会让眼睛舒服些
            context.fillRect(i.x, i.y, gridLength, gridLength)
        } else {
            context.strokeStyle = 'gray'
            context.strokeRect(i.x, i.y, gridLength, gridLength)
        }
    }
}, 1000 / fps)
随机操作所有格子填充灰色或不填充,就已经做到了“让所有格子动起来”。
最后,第五阶段,让格子根据规则运动。
// 先说明一下规则:
// 如果一个生命周围的生命少于 2 个,它在回合结束时死亡。
// 如果一个生命周围的生命超过 3 个,它在回合结束时死亡。
// 如果一个死格子周围有 3 个生命,它在回合结束时获得生命。
// 如果一个生命周围有 2 个或 3 个生命,它在回合结束时保持原样。
let gridLength = 40
let { width, height } = domCanvas
let grids = initData(width, height, gridLength)
let fps = 10
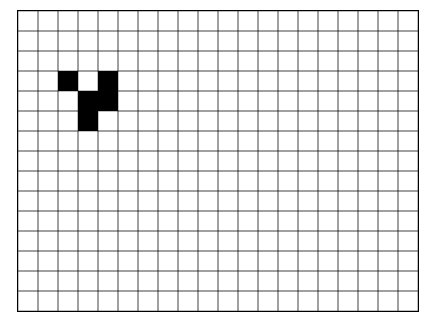
addGosper(grids, 2, 2)
window.grids = grids
setInterval(() => {
context.clearRect(0, 0, width, height)
let gridsCopyed = JSON.parse(JSON.stringify(window.grids))
for (let i of gridsCopyed) {
if (i.life === true) {
context.fillStyle = 'gray'
context.fillRect(i.x, i.y, gridLength, gridLength)
} else {
context.strokeStyle = 'gray'
context.strokeRect(i.x, i.y, gridLength, gridLength)
}
let nextLife = getNextRoundLife(i)
i.life = nextLife
}
window.grids = gridsCopyed
}, 1000 / fps)
// initData 前面已经说明过了
// addGosper 就是提前标记其中几个格子为存活状态
// getNextRoundLife 见下面的实现,本质上是计算各格子周围的生命数量决定下回合状态
const getGridLife = (row, col) => {
// 检查这个格子的生命状态
if (!window.grids) {
return false
}
let grid = grids.find((i) => i.row === row && i.col === col)
return grid ? grid.life : false
}
const getNextRoundLife = (grid) => {
let lifeAround = 0
let { row, col } = grid
// 上面三个
lifeAround += getGridLife(row - 1, col - 1)
lifeAround += getGridLife(row, col - 1)
lifeAround += getGridLife(row + 1, col - 1)
// 左右两个
lifeAround += getGridLife(row - 1, col)
lifeAround += getGridLife(row + 1, col)
// 下面三个
lifeAround += getGridLife(row - 1, col + 1)
lifeAround += getGridLife(row, col + 1)
lifeAround += getGridLife(row + 1, col + 1)
if (grid.life === false) {
if (lifeAround === 3) {
return true
}
}
if (grid.life === true) {
if (lifeAround === 2 || lifeAround === 3) {
return true
}
}
return false
}
目前为止,我们已经成功让游戏实现了,如果我们接着加入 Event 事件,加入细节优化,比如帧率调整、格子大小调整、颜色、这个游戏就可以直接玩了。
但是还不行!目前这份代码问题太大:
· 使用了全局 window 对象,这不好,一旦添加功能容易炸。
· 我们用的 setInterval API 其实并不能动态改变帧率,比较好的方式是两种:用 settimeout 递归、用 requestAnimationFrame 递归,并且也不应该自己管理这个绘制,应该托管起来。
· 我们的绘制、更新操作都是手动的,这会增加很多开发成本,一旦对象多起来,场景丰富起来,就会要写非常多的代码来负责绘制,不容易做抽象,也不容易修改维护。
· 格子生命的判定和绘图的逻辑不应该混合到一起,它们一个是数据状态,一个是绘图操作,应该拆分开。
· 我们没有把“格子”这个物体单独抽象出来,这不好。
要处理这些问题,我们需要换一个思维方式。在编程上采取更好的实现,将代码组织好,进一步设计自动刷新的模型,让程序接管更多人手动操作的部分。
const __main_v2 = () => {
    let domCanvas = document.querySelector('canvas')
    let context = domCanvas.getContext('2d')

    // 1,场景初始化,托管 canvas 和 context
    // 托管自动刷新渲染的 rendering
    let scene = new Scene()
    scene.registerCanvas({
        canvas: domCanvas,
        context: context,
    })
    scene.registerContinuousRendering()
    scene.setFps(2)

    // 2,抽离一个单独的 Life 物体(组件),自己负责自己的逻辑工作
    let lifeGame = new LifeGame(context)
    scene.registerObject(lifeGame)
}
理论上,和“整个游戏场景”有关的代码就只有这些:获取上下文、初始化场景、为场景添加物体。
至于物体到了场景里具体如何表现,只需要我们提前写好物体即可,换句话说,说这和场景本身是分离的。那么来看看和场景无关的 LifeGame 的实现:
class Grid {
    constructor(row, col, x, y, life) {
        this.row = row
        this.col = col
        this.x = x
        this.y = y
        this.life = life ? life : false
    }
}

class LifeGame {
    constructor(context = null, config = {}) {
        this.context = context ? context : null

        // life game 需要有很多属性,比如自己的初始化格子树
        this.gridLength = config.gridLength ? config.gridLength : 40
        this.containerWidth = config.width ? config.width : 800
        this.containerHeight = config.height ? config.height : 600
        this.grids = this.initGrids()

        // 手动添加一架高斯帕滑翔机,当然也可以不添加
        this.addGosper(2, 2)
    }

    copyGrids() {
        return JSON.parse(JSON.stringify(this.grids))
    }

    addGosper(startRow, startCol) {
        let { grids } = this
        let start = grids.find((i) => i.row === startRow && i.col === startCol)
        start.life = true

        let g2 = grids.find((i) => i.row === startRow + 1 && i.col === startCol + 1)
        g2.life = true
        let g3 = grids.find((i) => i.row === startRow + 2 && i.col === startCol + 1)
        g3.life = true

        let g4 = grids.find((i) => i.row === startRow + 0 && i.col === startCol + 2)
        g4.life = true
        let g5 = grids.find((i) => i.row === startRow + 1 && i.col === startCol + 2)
        g5.life = true
    }

    initGrids = () => {
        let { containerWidth, containerHeight, gridLength } = this
        let xLen = containerWidth / gridLength
        let yLen = containerHeight / gridLength
        let grids = []
        for (let i = 0; i < xLen; i++) {
            let row = []
            for (let j = 0; j < yLen; j++) {
                let g = new Grid(i, j, i * gridLength, j * gridLength, false)
                row.push(g)
            }
            grids.push(row)
        }
        return grids.flat(Infinity)
    }

    getNextRoundLife(grid) {
        let lifeAround = 0
        let { row, col } = grid

        lifeAround += this.getGridLife(row - 1, col - 1)
        lifeAround += this.getGridLife(row, col - 1)
        lifeAround += this.getGridLife(row + 1, col - 1)

        lifeAround += this.getGridLife(row - 1, col)
        lifeAround += this.getGridLife(row + 1, col)

        lifeAround += this.getGridLife(row - 1, col + 1)
        lifeAround += this.getGridLife(row, col + 1)
        lifeAround += this.getGridLife(row + 1, col + 1)

        if (grid.life === false) {
            if (lifeAround === 3) {
                return true
            }
        }
        if (grid.life === true) {
            if (lifeAround === 2 || lifeAround === 3) {
                return true
            }
        }
        return false
    }

    getGridLife(row, col) {
        let grid = this.grids.find((i) => i.row === row && i.col === col)
        return grid && grid.life ? 1 : 0
    }

    update() {
        let gs = this.copyGrids()
        gs.forEach((g) => {
            let nextLife = this.getNextRoundLife(g)
            g.life = nextLife
        })
        this.grids = gs
    }

    draw() {
        if (!this.context) {
            return
        }
        const { context, grids, gridLength } = this
        for (let i of grids) {
            if (i.life === true) {
                context.fillStyle = 'black'
                context.fillRect(i.x, i.y, gridLength, gridLength)
            } else {
                context.strokeStyle = 'black'
                context.strokeRect(i.x, i.y, gridLength, gridLength)
            }
        }
    }
}
目前的组织方式是使用了一个 Scene 对象,Scene 对象提供了注册上下文的方法,提供了自动渲染,并且允许添加物体,交给 Scene 来处理。
我们在外部层面不再关心物体是如何被画出来的,我们只知道造出一个符合标准的“物体”,然后添加到场景里,它就一定会被画出来。
class Scene {
    constructor() {
        this.fps = 10
        this.pause = false
        this.canvas = null
        this.context = null
        this.objects = [] // 所有物体
    }

    registerCanvas(props) {
        this.canvas = props.canvas
        this.context = props.context
    }

    registerContinuousRendering() {
        let { canvas, context } = this
        setTimeout(() => {
            if (this.pause == true) {
                return
            }
            context.clearRect(0, 0, canvas.width, canvas.height)
            this.update()
            this.draw()
            this.registerContinuousRendering()
        }, 1000 / this.fps)
    }

    registerObject(obj) {
        this.objects.push(obj)
    }

    setFps(fps){
        this.fps = fps
    }

    update() {
        for (let i of this.objects) {
            i.update()
        }
    }

    draw() {
        for (let i of this.objects) {
            i.draw()
        }
    }
}
我们造出来的标准物体就是 LifeGame,它非常简单,其他方法我都是拷贝的 V1 版本,只有一个地方有区别,数据更新和绘制的逻辑被拆分开,变成了两个方法:update 和 draw,只要有这两个方法,他们就会被 scene 自动处理。因此,我们专心在这两个方法里决定好自己被画成什么样就行了。
最终游戏看起来像这样:我们提前添加一架滑翔机,然后让程序自动运行就好。
生命游戏很简单,我们讲到这里,如果我们运用上这个思路,只需要不停地往场景里添加物体,就很容易做出来一个真正的游戏,例如看下面这段伪代码做的事:
let scene = new Scene()
scene.registerContinuousRendering()
scene.setFps(2)

let cloud = new Cloud()
cloud.x -= random(0, 10) // 0-10 之间随机一个数字
scene.registerObject(cloud)

let monster = new Monster()
monster.hp = 100
scene.registerObject(monster)

let hero = new Hero()
hero.attack = 25
hero.hp = 10
scene.registerObject(hero)


scene.registerEventsPressKey('j', () => {
    hero.jump()
})
scene.registerEventsPressKey('i', () => {
    hero.chop()
})
这就构建出了一个有背景(云朵)、有怪物(和生命值)、有主角的游戏,并且通过绑定键盘事件,在按下 “j” 的时候会跳跃,在按下 “i” 的时候会挥剑攻击的游戏。
只要我们提前写好 Cloud, Monster, Hero 对象,我们就可以在业务层很简单地做到这些事。这就让游戏可以完全按照我们的兴趣被创造。
本文根据 Authing 开发者活动的演讲内容整理,有兴趣的读者可以尝试一下,最后祝大家周末愉快~